In order to use you radio in ANALOG and DIGITAL Mode, you will need to download the following software from these locations. It is best you put them all into a separate download folder as not to have to search for these after you download in what may be a crowded download file you may already have.
HDSDR - Graphical Interface Radio Program
Download version 2.81 (January 15, 2025)
When you execute the install the program will install into your PROGRAM FILES (x86) 32 bit folder if you have a 64 Bit Machine. If not it will be found in your PROGRAM FILES FOLDER.
If you are not sure if you have 64 bit technology, look in your C: Drive and see if you have two Program File Folders. One will say (x86)
Install the program and make a shortcut to your desktop.
This program can be opened multiple times. You will start one for each radio in your device. You will size the program screen to accommodate two or more screens.
___________________________________________________________
Download the Driver Program ZADIG. You will find it here. Please note IMPORTANT. The version is for Windows 7 and later. If you have an XP or VISTA OS you will need to go to older versions and use the 2.2 earlier version.
Once downloaded copy it to the same folder where you HDSDR program is. Paste in in the folder and make a shortcut to your desktop.
PLUG YOUR RADIO DEVICES AND POWER THEM UP.
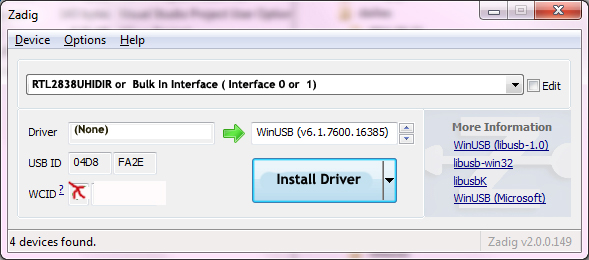
You will run this program to install the WINUSB driver for each RTL device. Open the OPTIONS tab and chose "List all devices" In the drop box you will find your plugged in RTL devices listed as RTL2838UHIDIR or as BULK IN INTERFACES 0 and 1. (watch video at the right)
You will need to select each of these devices and install the WINUSB selection and install the driver. If you get a failed install on the first attempt, just reboot your computer and it should do an update and then you can continue to complete the process for the other RTL devices.
__________________________________________________________
Extract contents. Put the EXTIO_RTL.dll file and copy/paste into your HDSDR program folder which was installed in your program files or program file (x86) folder.
___________________________________________________________
Download the DSDPlus Digital Decoder program here. Download the NEW RELEASE zipped file and unpack it to one or more separate DSD+ named folders depending on the number of separate instances you want to use.
Direct Download link - See the link to the right for setting up DSD+ Fast Lane to follow Trunked Radio (P25 Phase 1 or 2, DMR or NXDN)
___________________________________________________________
Virtual Cables (software - VB Cable)
You will need to download 1, 2 or 3 cables from the website
VBCable (ZIP FILES)
Donationware. Consider purchasing additional cables via donation to enable multiple digital band monitoring as they will allow you to hear channels transmitting simultaneously without voice cancellation.
Just like DSDPlus these are ZIP Files and you need to create VBCable files under your C: Drive. Example VBCableC, VBCableB and VBCableA.
Extract the Cables into their folders and install them. Please note there is a SETUP and a SETUP64 bit. Choose the correct one. IMPORTANT - When installing the Virtual cables make sure you ARE THE ADMINISTRATOR of your computer. If not run "as administrator" when installing the cables.
Once installed you should reboot your computer. If you have a single radio, you are ready to go.
Make a shortcut to your desktop for the DSDPlus application (exe file)
____________________________________________________________
DUAL RADIOS or MULTIPLE UNITS
You have two or three versions of DSDPlus and Three VB Cables. If you wish to follow digital channels on each version of DSDPlus then you need to have each running on it's own cable.
EXAMPLE:
DSD+1 - VBCable A
DSD+2 - VBCable B
DSD+3 - VBCable C (it shows as VB without the "C")
___________________________________________________________
So you need to start two or more instances of HDSDR and you need to start DSD+1,2 and 3 and when you start them you want them to automatically use specific cables. This can be easily done by using a batch file.
___________________________________________________________
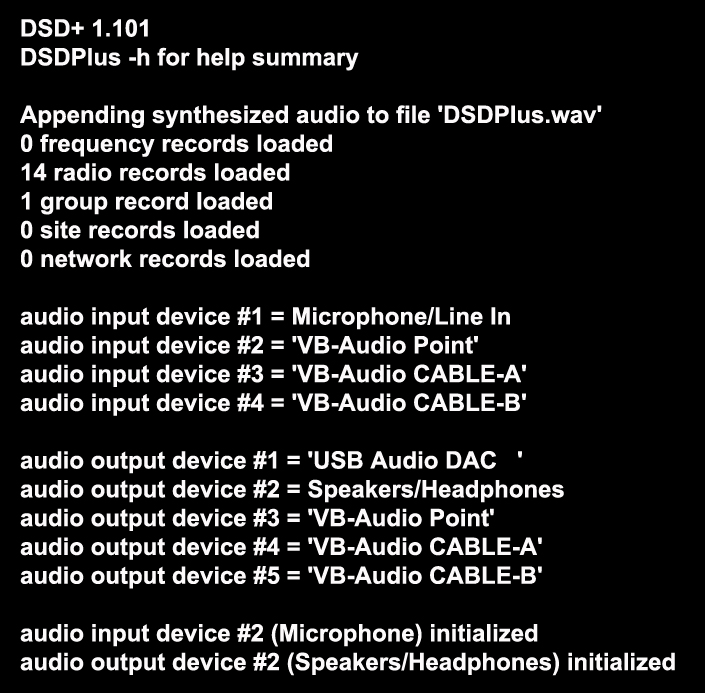
You saw on the operation information how to set your sound setting defaults. When you open any DSDPlus.exe it will automatically open the default setting.
EXAMPLE
input device - default VB Cable
output device - default - Speakers, Soundcard or Headphones
When you start the DSD+ program the screen will give you all your recording devices and all you Playback devices followed by the two default selections from that list. (see picture right)
This is fine when opening one DSD+ decoder. But when you open #2 and/ or #3, you do not want the same cable but instead VBcable A or B.
WRITE A BATCH FILE
Go to the DSD+1 and make shortcut to desktop. Run the program and make a list of the input/output devices which DSD+ numbers. Your recording cables may be #''s 1,3 and 4 for example with #1 being your default for DSD+1. That's fine.
Go to DSD+2 folder and create a new text file. When notepad opens you type the following
start DSDPlus.exe -i3 -o2
You have instructed DSD+2 to open the file using VBcable A or B instead of the default DSD+1 cable. This is indicated by the number placed after the "i" for input. The output number is always your sound default device which is probably listed as a soundcard or speakers
Playback output devices are usually # 1 but if it is another number like then you change for example to -o2 or -o3 depending on that number.
Now you need to save this into the DSD+2 folder. Name it DSD+2.bat and save as "all files" and NOT Text file. Then make a shortcut to your desktop.
Do the same procedure for DSD+3 and if you have a fourth or more you will have to duplicate one of the 3 VB cables.
The benefit is that if you are running multiple radios and there are simultaneous transmissions coming in, the decoders and sound will not cancel each other out with silence.
To follow Trunked Radio Systems see the UNITRUNKER to the right. These are instructions for Download and Setup.
HAPPY HUNTING!!!